What is a physical network implant? why would you need a physical network implant?
Physical network implant is a device which is plugged inside the target's network and is configured to call back to a server on internet and establish a stable reverse connection, A user would then generally access this device via the server it connected back to on the internet and access the internal network in which the device is planted.
These implants can be used to maintain persistence internal network access and can be utilized based on the use case.
Few Important things to note before we get into configuring physical network implants:
1.) Device of choice which is going to be utilized for the physical implant.
2.) Raspberry Pi Zero due to its small size and compact appearence is a perfect choice for physical implant where you don't want it to be easily spotted by anyone.
3.) This article will discuss about configuring network implants mainly on Linux.
4.) Configuration for windows will also be discussed but its not very reliable and stable.
5.) The implant can be configured to establish tunnels back using two ways OpenVPN tunnel and Reverse SSH tunnel.
6.) The OpenVPN and SSH tunnels can be run at the same time on the implants to have two reverse tunnels at same time.
7.) When Either of them is down the other can act as a backup tunnel.
Some steps to make the implant less detectable on the network (will discussed in detail in another article):
1.) MAC address randomization can be configured on the implant.
2.) A script can be configured to run in background that sends port scanning packets randomly on the subnet with spoofed or decoy IPs.
3.) Spoof the Hostname of the machine to one of the devices present already in the network or set it to a generic hostname.
Diagram for Implant Inside an internal network using SSH tunnels:
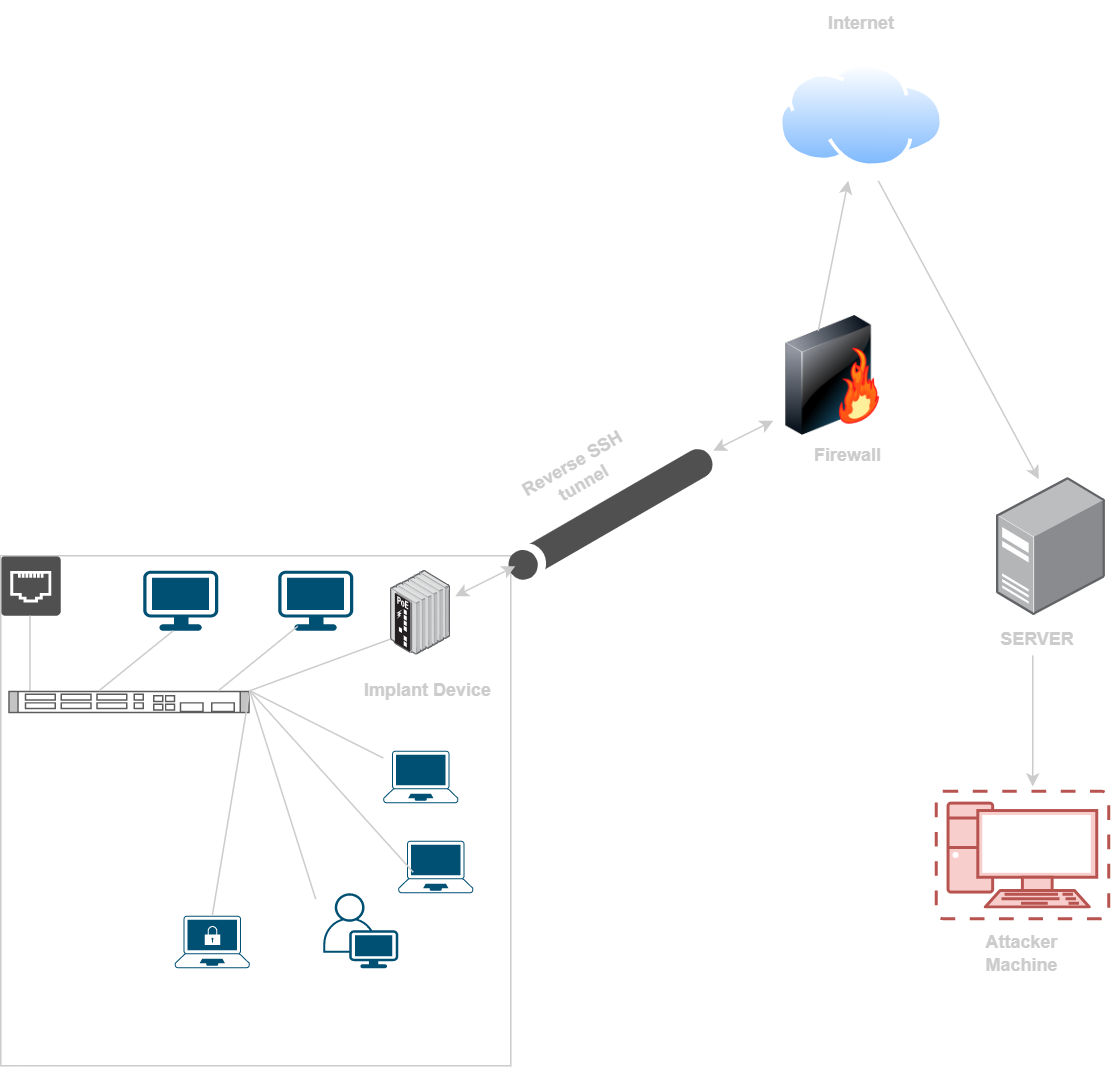
1.) The Implant first establishes a tunnel back to a SERVER (controlled by the attacker) on the internet its configured to connect back to.
2.) The attacker can then connect to this server.
3.) The implant device can then be accessed via the SERVER (this will be discussed in detail later), which will now be acting as a JUMPBOX.
Configuring SERVER and the IMPLANT:
SSH SERVER CONFIGURATION:
1.) The implant machine is going to connect back to the server and basically get a command shell as well.
2.) For security of the server best practice is to create a new user on the server and configure the implant to connection back to server with this user.
3.) For example we can create a new user named tunneluser on the SERVER machine.
4.) Following command can be used to do so: "adduser tunneluser".
5.) Next Step is to change the SSH port of server from 22 to 443
6.) This will ensure that the outgoing SSH tunnel connections from implant are not blocked by firewall.
7.) To change the port you can edit the configuration file "/etc/ssh/sshd_config"
8.) Edit or add the following line to the sshd_config file: Port 443
9.) If possible it is always good to have DNS name assigned to SSH SERVER machine.
IMPLANT CONFIGURATION:
1.) The implant can now be configured for SSH tunnels.
2.) we are going to utlize autossh for our automatic SSH tunneling configuration,.
3.) We will create a service on the system which triggers execution of the autossh program automatically on boot.
4.) You can choose a custom name for service, here we are naming it tunnel.service and we will save it to "/etc/systemd/system/tunnel.service".
5.) The simplest configuration for this service is given below
6.) The ExecStart Parameter contains the main command to create the reverse tunnel
7.) Port 2222 will be binded to localhost on the target SERVER machine and all traffic will be redirected to 22 on IMPLANT machine via the reverse tunnel
8.) You can choose to use a different port than 2222, just make sure its not already being used by any other program.
9.) Manually a test SSH connection can be made on the IMPLANT machine just to add the host to known_hosts list and ensure smooth working of this direct command later (since we are not using options to skip this automatically in the ExecStart Command).
10.) Next we need to enable this service using following command: "systemctl enable tunnel.service"
11.) This service will run automatically on system boot everytime.
SSH KEY CONFIGURATIONS:
1.) We will configure key based ssh authentication between IMPLANT and SERVER.
2.) If not already present on the IMPLANT machine, as "root" user we will generate ssh key pairs with command: "ssh-keygen"
3.) we will copy contents of the "id_rsa.pub" which is the public key.
4.) On the SERVER machine we will switch to tunnel user and then repeat the process of generating the ssh key pair with command: "ssh-keygen"
5.) On SERVER machine We will then save the previously copied public key from IMPLANT machine to "/home/tunneluser/.ssh/authorized_keys"
6.) Make sure to save it on new line if you already have other key(s) added to file. example command: "echo 'key_value' >> /home/tunneluser/.ssh/authorized_keys"
7.) At last we will disable password based authentication on the SSH SERVER
8.) Make sure that you have added public key of your host system to authorized_keys in respective users directory on the SERVER machine so that you don't loose access to SSH if its currently password based.
9.) In the file "/etc/ssh/sshd_config" we add following line "PasswordAuthentication no"
FINAL TEST:
1.) Once everything is setup as a test we can start the service with: "systemctl start tunnel.service".
2.) Now on the SERVER machine a reverse tunnel should be created.

3.) Now you can get a ssh session on the IMPLANT machine with: "ssh -p 2222 user@127.0.0.1"
4.) Since the IMPLANT machine is connected to an internal network, we effectively have access to that internal network using the IMPLANT machine remotely
OpenVPN Setup Configuration:
1.) Now we will look at another method of configuring the physical network implant for reverse connections.
2.) Instead of using reverse SSH tunnels, this setup will use OPENVPN tunnels.
3.) Note that the setup will be similar to VPN split tunneling and internet traffic would not be routed through the VPN tunnel.
4.) Only subnet specific traffic will be routed through the VPN, this will allow us to also simuntaneously run the SSH tunnel.
5.) We can configure the VPN to route internet traffic but then doing this during the implant being used at same time might cause issues and we might loose access to the implant once its planted inside the network.
6.) Unless you don't plan on using both SSH tunnel and OpenVPN tunnel at same time (having both will ensure backup access), you can enable routing IMPLANT internet traffic through VPN.
7.) Below is diagram for implant inside internal network using OpenVPN ssh tunnel.
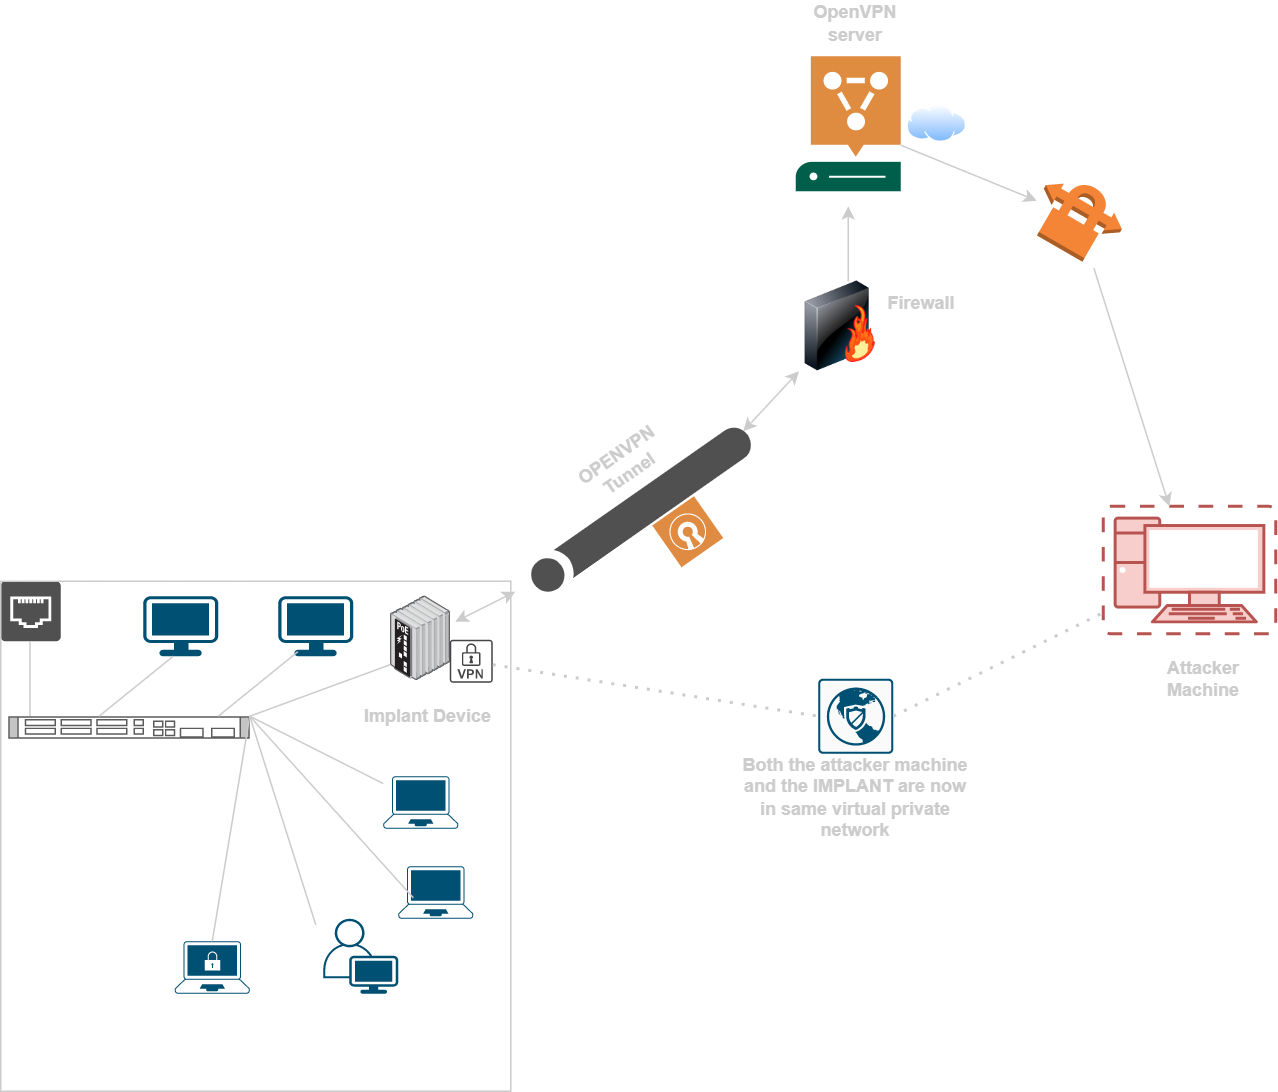
Both the attacker machine and the IMPLANT machine are connected to VPN server and in same VPN network hence they are now able to communicate with each other.
CONFIGURING THE OPENVPN SERVER:
1.) We need a linux machine on the internet to start with.
2.) we use a simple debian machine here, this can easily be deployed on Azure or AWS
3.) We will install the OpenVPN access server on this machine.
4.) An account is required to use OpenVPN access server and the free license allows only 2 simuntaneous VPN connections, which should be sufficent in our case.
5.) Once you create the account and login (https://as-portal.openvpn.com/instructions/debian/installation), you should see install instructions in "Quick Start"
6.) The commands to install OpenVPN access server on a Debian machine via the OpenVPN repository are given below:
7.) If you get errors with repository install then try installing manually by downloading the debian packages.
8.) If errors persist try doing the install on different OS may be ubuntu this time.
9.) After the install the OpenVPN access server will automatically run and the Web UI will also be started with temporary credentials as shown below

10.) We can do a local ssh forward to access the port 943 on the VPN Server on our machine.
11.) Simple command to do so is following: "ssh -i key.pem -L 127.0.0.1:943:127.0.0.1:943 user@[VPN-SERVER-IP]".
12.) Now we will be able to access the web GUI from our machine at "https://127.0.0.1:943".
13.) When you access the admin WebGUI for first time it will ask for the activation key, you can get these from the openvpn AS portal where you signed up earlier. It is also very important that you go to Configuration --> Network Settings and then change the Hostname or IP Address value to the Public IP address or Public Domain (if assigned) of the deployed VM machine on which access server is installed.

14.) Remember to change the Hostname or Public IP to public IP of VM under network settings
15.) Next we will restrict the web GUI running on port 943 to IP of our choice, this is to protect the login web portal from unauthorized access (depending on azure or aws or local deployment) (there are options to restrict to localhost and seprate admin and client GUI but we don't discuss them in current article)
16.) Next we will change the temporary login password for the user "openvpn" to a more strong password.
17.) The openvpn login user password can be changed in User Management --> User Permissions --> openvpn --> More settings (click edit pencil logo)
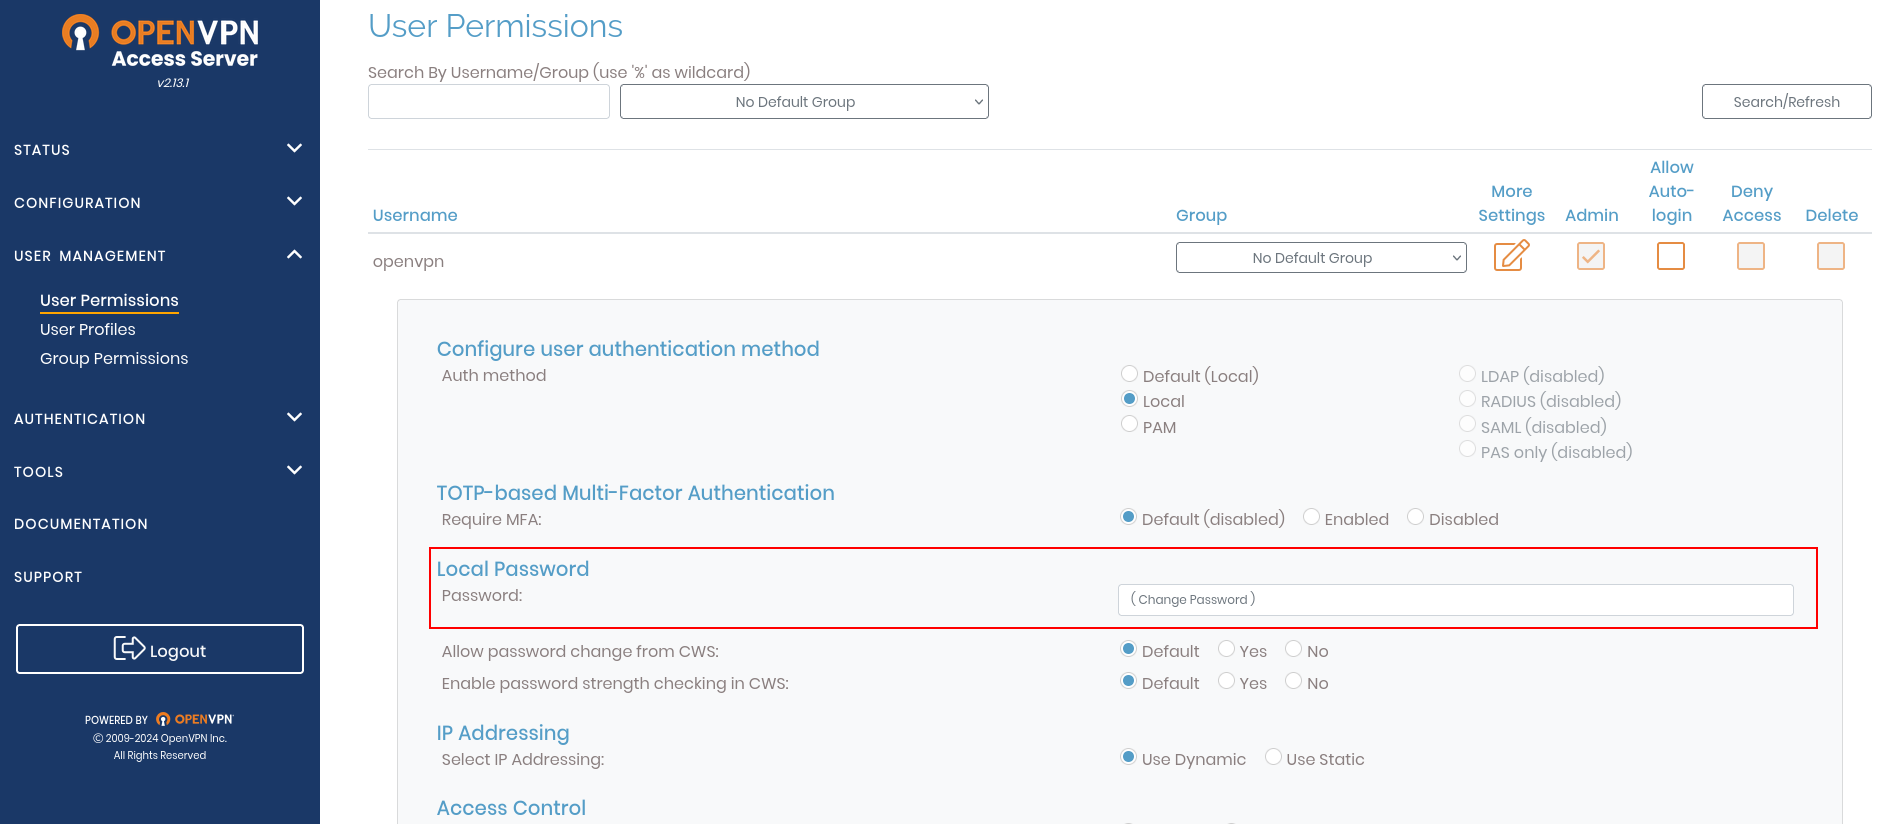
18.) Now we need to change some settings for VPN itself.
29.) We will disable routing internet traffic through the VPN by disabling this option in "VPN settings".
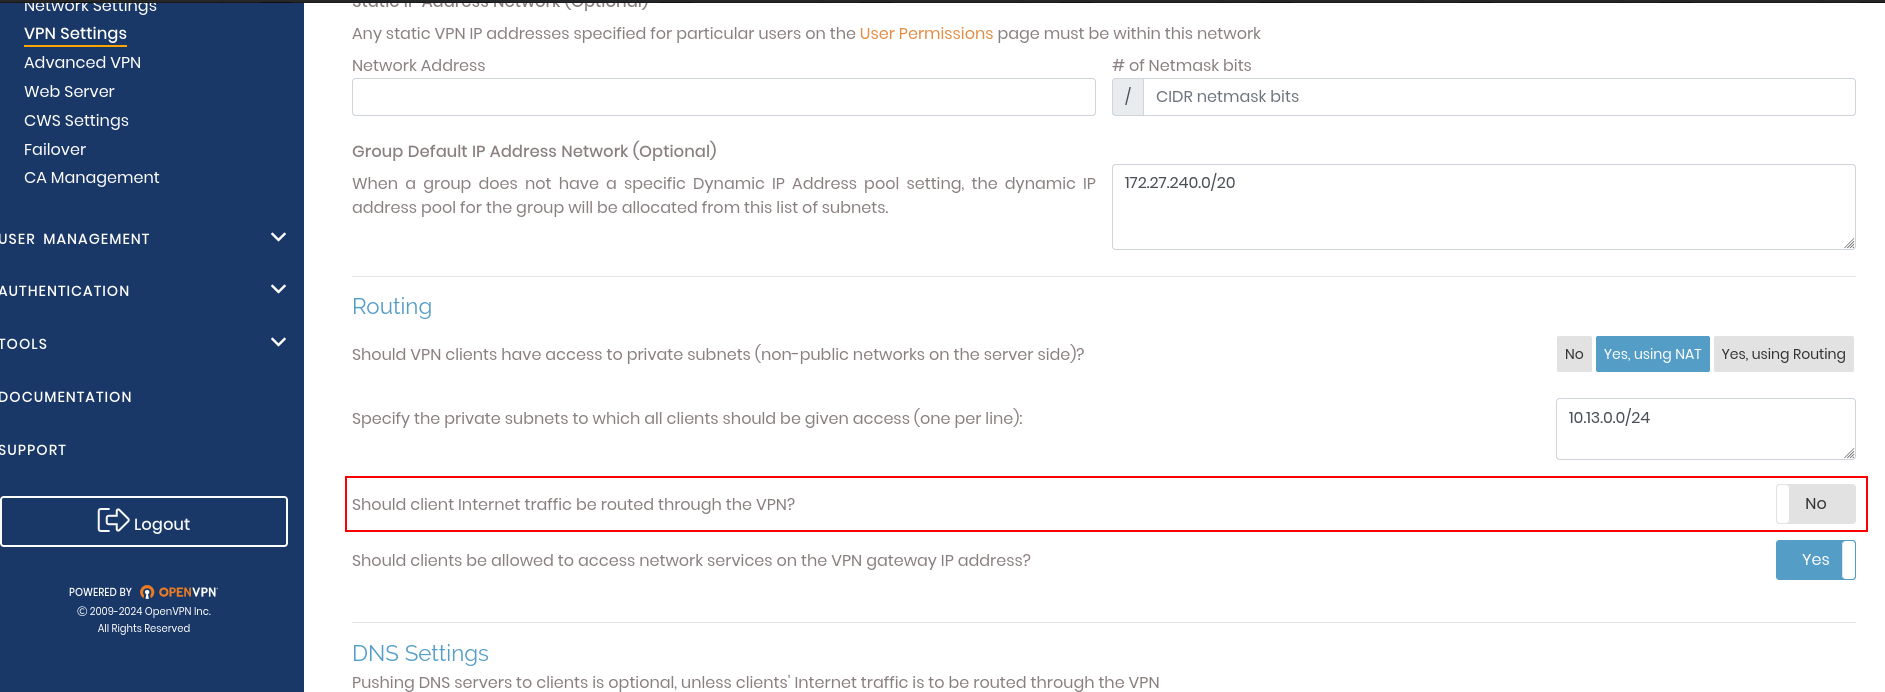
20.) Now we need to change some settings for VPN itself.
21.) First we will disable routing internet traffic through the VPN by disabling this option in "VPN settings".
22.) Make sure to scroll to bottom and Click on "Save Settings" and also then click on option "Update Running Server" that appears on top after saving settings
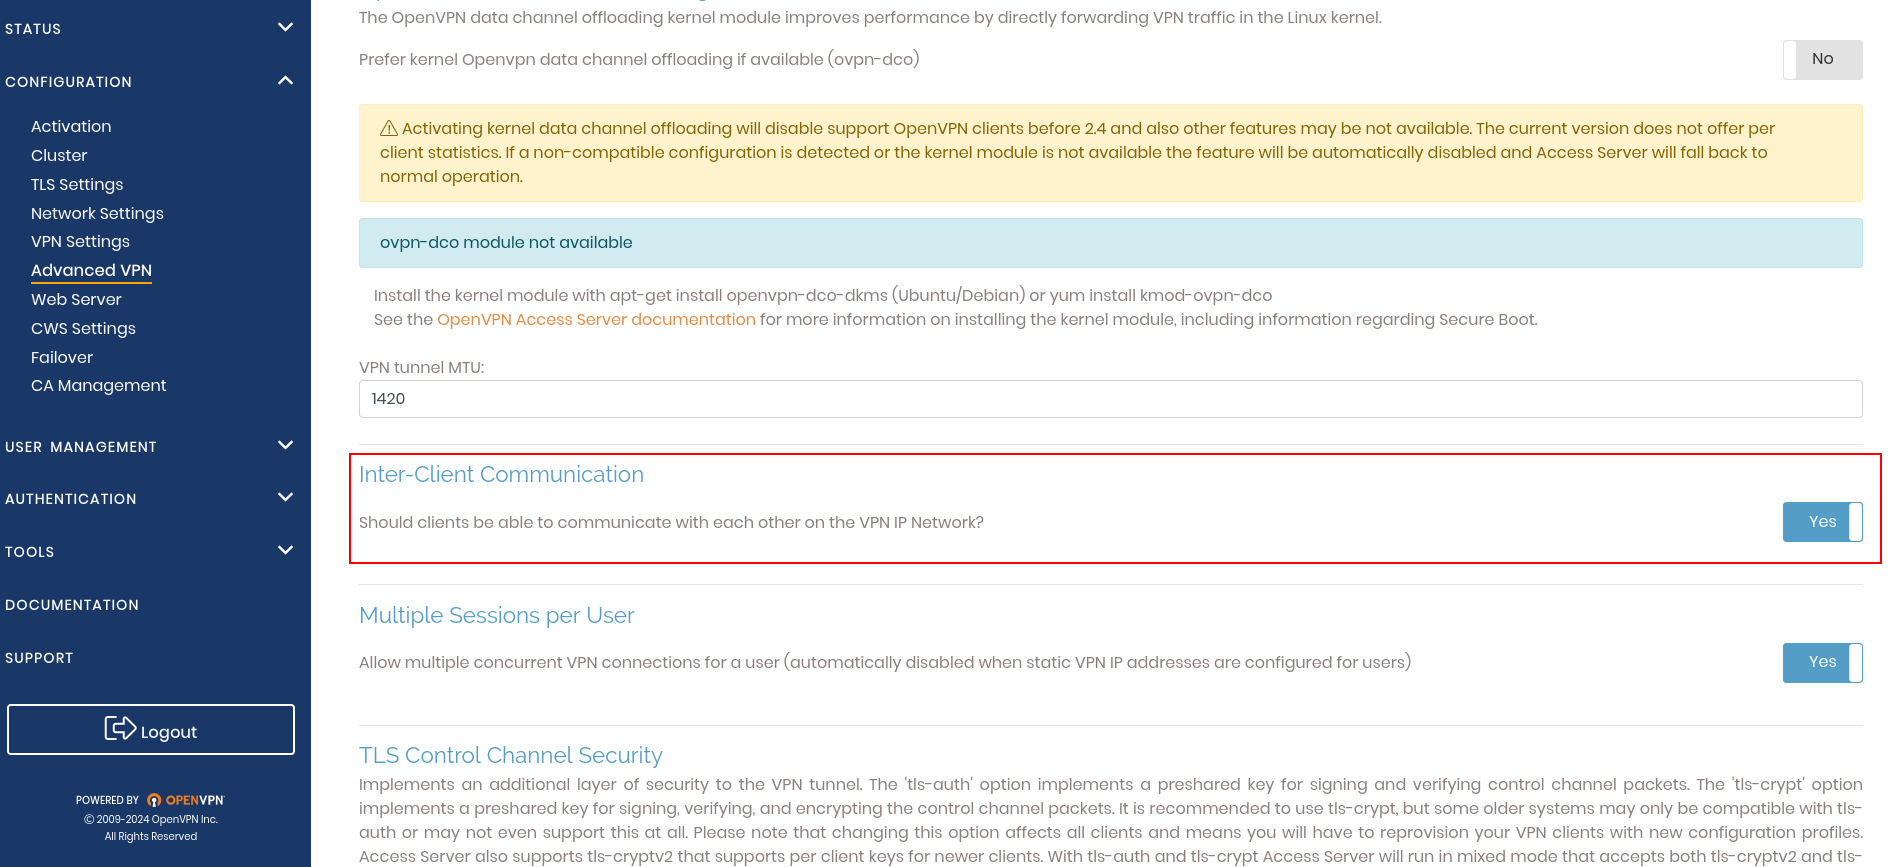
23.) Then we will enable inter client communication under "Advanced VPN".
24.) This will basically allow our attacker machine and the implant machine to communicate with each other once both are connected to VPN at same time.
CREATING CLIENT USERS:
1.) Now we will create client users which are going to connect to the VPN
2.) we will again go to "User Management --> User Permissions" and add two new users vpncl1, vpncl2
3.) We also need to Click on Allow Auto-Login when configuring user permissions.
4.) Make sure to scroll to bottom and Click on "Save Settings" and also then click on option "Update Running Server" that appears on top after saving settings
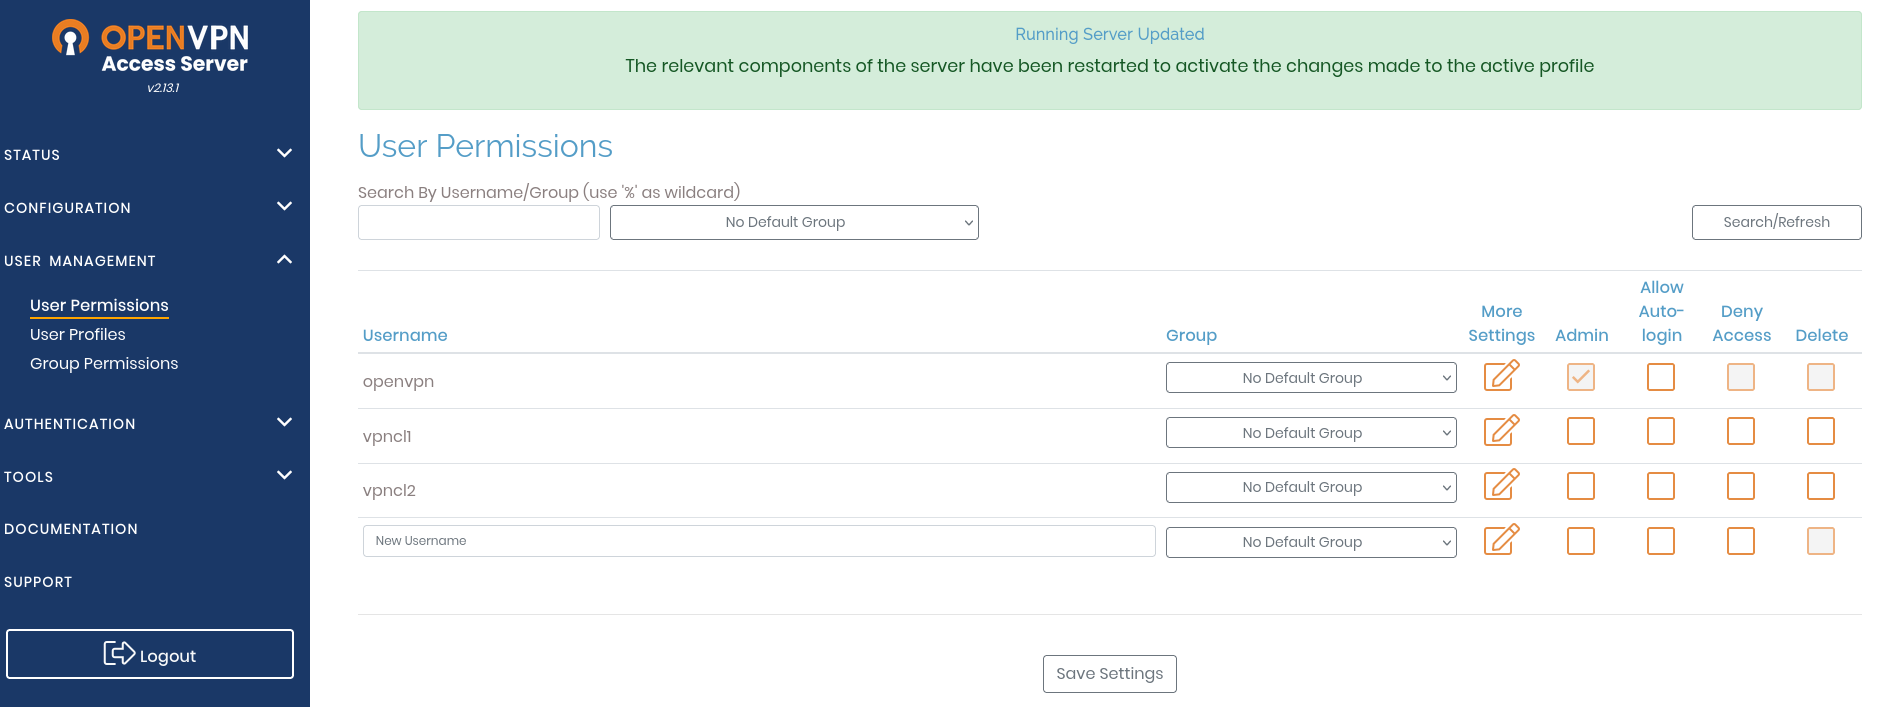
5.) Once the users are added with auto login enabled, their configuration files can be downloaded.
6.) we will go to "User Management --> User Profiles --> Select User --> New Profile --> Create Profile" the profiles will be downloaded and can be renamed with the respective username in front.
7.) Make sure to select the AutoLogin option, by default when creating a profile its set to user locked but we need AutoLogin to be enabled.
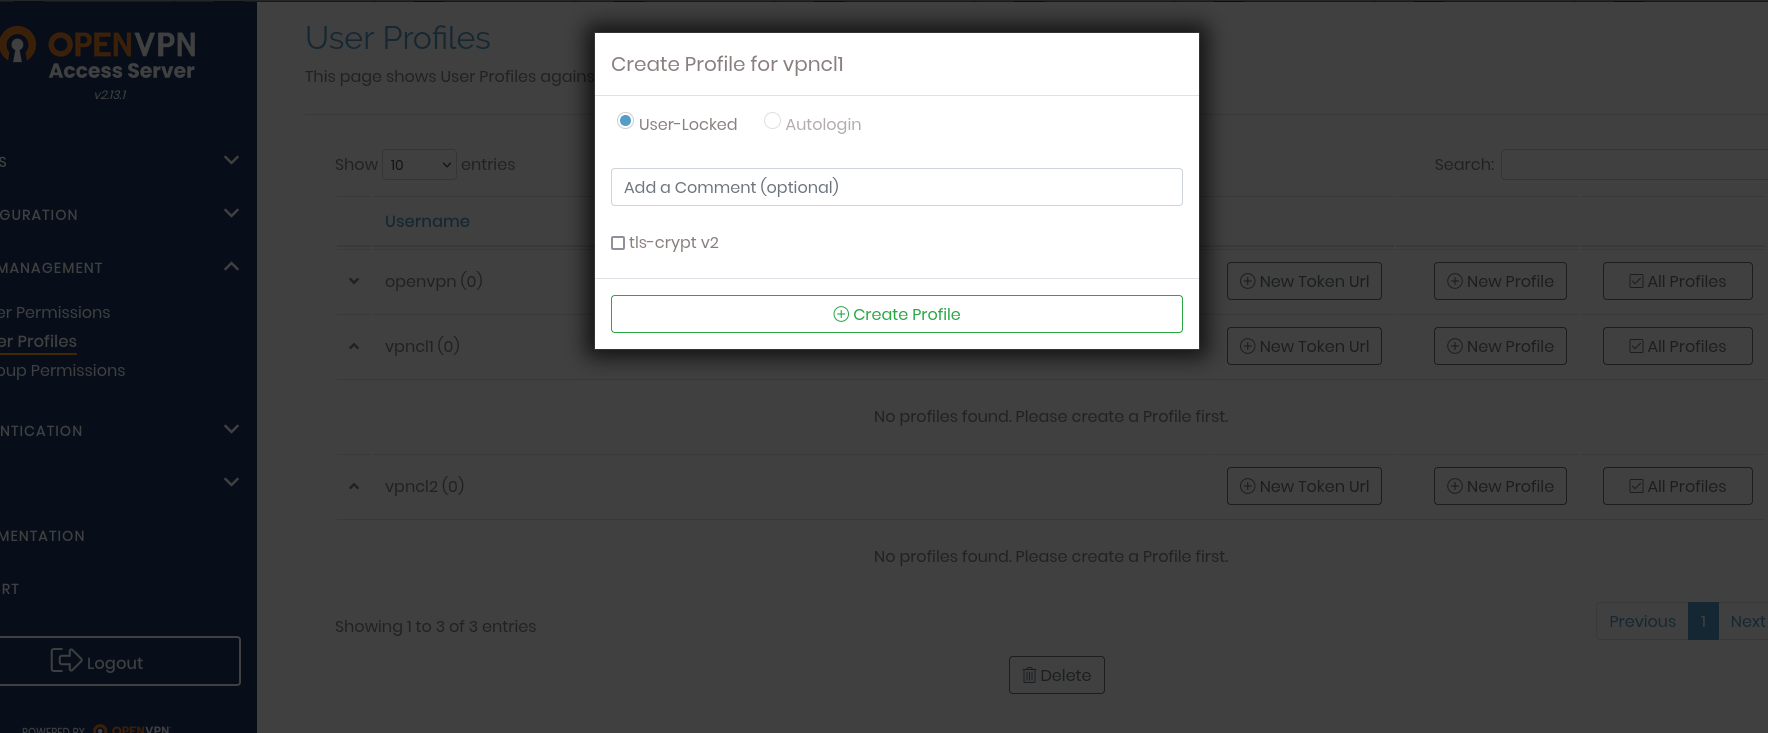
8.) These ovpn files will now be ready to be used with IMPLANT.
9.) At Last on the OpenVPN ACCESS SERVER Make sure the port 1194 is allowed for incoming connections (Azure or AWS firewall rules for machine)
CONFIGURING OPENVPN CLIENT ON IMPLANT MACHINE:
1.) You can choose to use anyone of the two client configurations (profiles) which were created earlier.
2.) We are going to configure the openvpn client on rasberry pi which will take the configuration profile we created earlier and connect to VPN everytime on boot.
3.) First transfer the configuration profile to the IMPLANT machine.
4.) Make sure openvpn client is installed on the client machine: "apt install openvpn"
5.) Then copy the contents of file vpncl1.conf (file in which we saved user profile for vpncl1, we have renamed it.) to /etc/openvpn/client.conf
6.) Once this is done we will enable the OpenVPN service first with: "systemctl enable openvpn.service"
7.) Next we will start the service with: "systemctl start openvpn.service"
8.) Note that we have enabled autologin in user permissions and also when generating the profile, this allows connecting directly with the .ovpn files without specifying any extra credentials.
9.) If everything went correctly we will see the IMPLANT machine connected under "Status --> Current Users"

CONNECTING THE SECOND CLIENT (The Attacker Machine):
1.) Connecting would differ based on the host operationg system in use.
2.) From linux machine the VPN connection can be made simply by executing: "openvpn vpncl2.ovpn".
3.) However this command needs to be run everytime a connection is needed, for automatic process the steps stated in previous section for implant can be replicated with vpncl2.ovpn file.
4.) To connect from windows machine the OpenVPN community clien needs to be downloaded: Download OpenVPN Connect v3 widnows
5.) Once downloaded and installed, run the connect client.
6.) Select the Upload File option from the GUI and upload the vpncl2.ovpn file here.

7.) Once the file is imported the connection can be made by clicking on connect.
8.) Now both the machines, the implant as well as the attacker will be connected to the VPN.
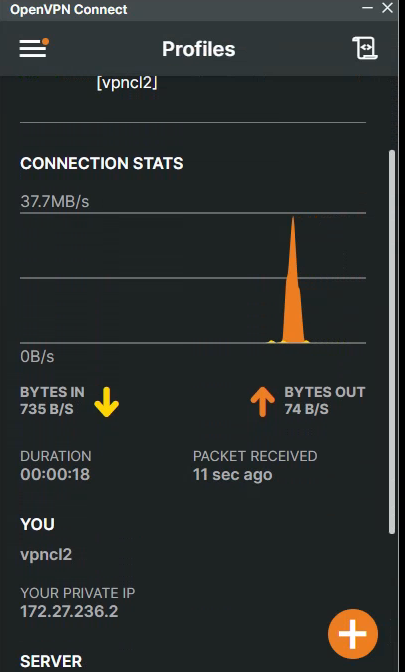
9.) We can check the status again from the VPN portal and this time both vpncl1, vpncl2 will showup as connected at same time.

10.) We can see the internal VPN IP of IMPLANT machine (vpncl1) as 172.32.232.3 and that of the Attacker machine is 172.27.236.2.
11.) From the attacker machine we will try to ping test the IMPLANT machine with command: "ping 172.32.232.3"

12.) The pings work which means the devices are able to reach each other via the VPN tunnel and now we can SSH to the implant machine with command: "ssh user@172.27.232.3".
13.) Since the IMPLANT machine is connected to an internal network, we effectively have access to that internal network using the IMPLANT machine remotely.
Wireless Endpoint Access: The Ultimate Backup if Both SSH Tunneling and OpenVPN tunneling FAIL!!!!:
1.) Although it is very less likely but if both the SSH tunneling and OpenVPN tunneling fail, then we need to have a backup access.
2.) Why would the SSH tunnel or OpenVPN tunnel fail?
3.) In first case, If the network has access control over port in which the IMPLANT is plugged, it will not have internet access which would mean no reverse tunnels, in this case nothing can be done.
4.) In the second case, if the network has super strict filtering that somehow blocks outgoing SSH tunnel and OpenVPN tunnel but the device is assigned an internal IP address and is able to access internet, a wireless access method can be configured on the implant.
5.) In this case we will have to plant a router to a power source along with the implant that can host a wireless access point in the same vicinity.
6.) Or we can configure the implant itself to host a wireless access point (we will see this in another article)
7.) For now we will assume that using a router (or by any other means) a wireless AP is hosted in a close proximity of the implant
8.) Lets assume that the wireless AP has SSID: AP91 and password: "password1234"
9.) There is a drawback with this method, under normal circumstances the attacker also needs to be in close promixity of the wireless AP to connect to it and then reach the IMPLANT via the local LAN of wireless AP.
10.) This can be overcomed by having a Parabolic antenna on the attacker side to reach the wireless access point from long distances.
11.) These methods however might not be that stable.
12.) The diagram below is for IMPLANT using wireless access.
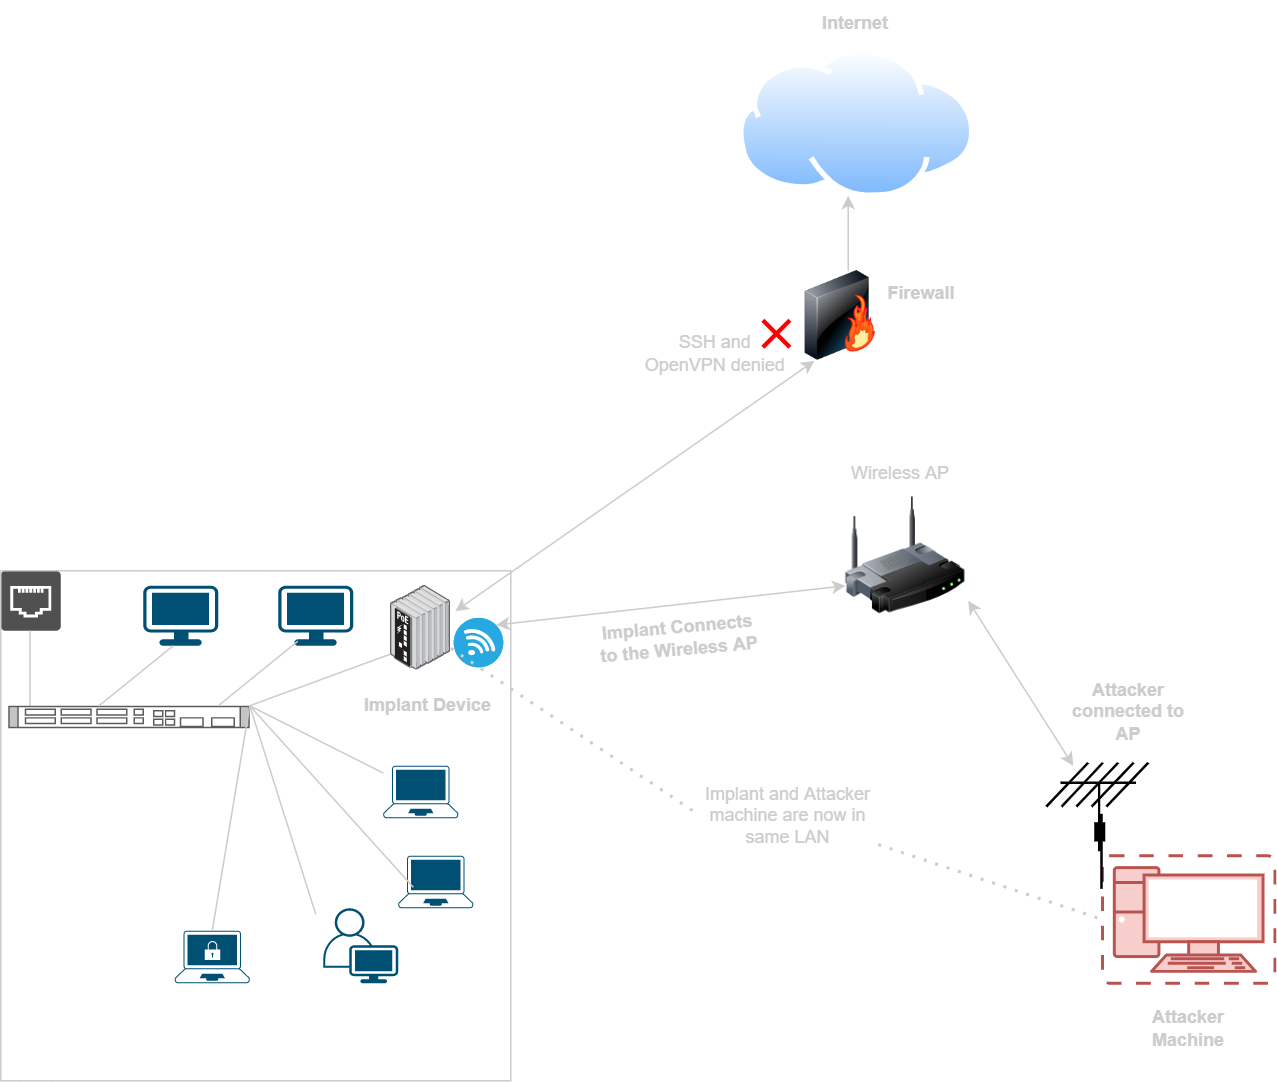
13.) When both the IMPLANT and attacker machine are connected to same AP, both will be in same LAN.
13.) Hence both the machines will be able to communicate with each other via the wireless interface.
14.) To connect to the wireless point automatically we will use wpa supplicant on the IMPLANT machine.
15.) WPA supplicant can be installed on the IMPLANT (raspberry pi in current case) machine using command: "apt install wpasupplicant"
16.) The configuration file needs to created at following location: "/etc/wpa_supplicant/wpa_supplicant.conf"
17.) Below is simplest configuration for our wireless access point AP91
18.) The SSID and psk can be changed according to the wireless AP configuration
19.) The implant will try to connect to the AP91 wireless network everytime on boot.
20.) At the same time attacker can connect to this wireless AP and connect to IMPLANT machine via SSH.
The Ending TRIO:
1.) On ending note the best settings would be to have all the three things running at same time.
2.) Running OpenVPN tunnel (without internet traffic routing) with SSH tunnel and the wireless backup as at same time will ensure stable access to the implant machine in any way possible.
© 2024 Vrikodar